

Use ReportLite External Library to Auto-insert Reports to Word Templates
Use ReportLite External Library to Auto-insert Reports to Word Templates
In many business scenarios the report is required to be embedded to the Word document. Here is a report:

The report displays graduate employment information in a certain year. The data in the table and for plotting the chart in the report comes from the database. It is simple and easy to create such tables and charts using a reporting tool, but it is complicated to embed them to Word documents. Traditionally there are two methods. One is to export the finished report and chart as a Word document and manually copy and paste them to the Word report. The other is to create the whole report as a template and export it to Word. For method 1, the pure manual operations are slow; and for method 2, the reporting tool offers limited typesetting services and cannot generate satisfactory Word layout effects.
Well, is there any other method?
Usually, such reports have standard templates. We just need to replace certain information at regular interval, such as document number (Document NO.), reporting time (Created on), the specific year, image, and the report and chart under each section in the above report. Only these pieces of information are dynamic, and the textual description part and the overall layout remain unchanged. If we can automate the process of embedding reports to Word documents through by making it like the assembly-line style, there would be an optimal solution that yields twice the result with half the effort.
With esProc, we can use ReportLite external library to embed reports to Word documents according to the following directions:
1. Create Word template to set bookmark at positions where new text will be inserted or where the text will be replaced
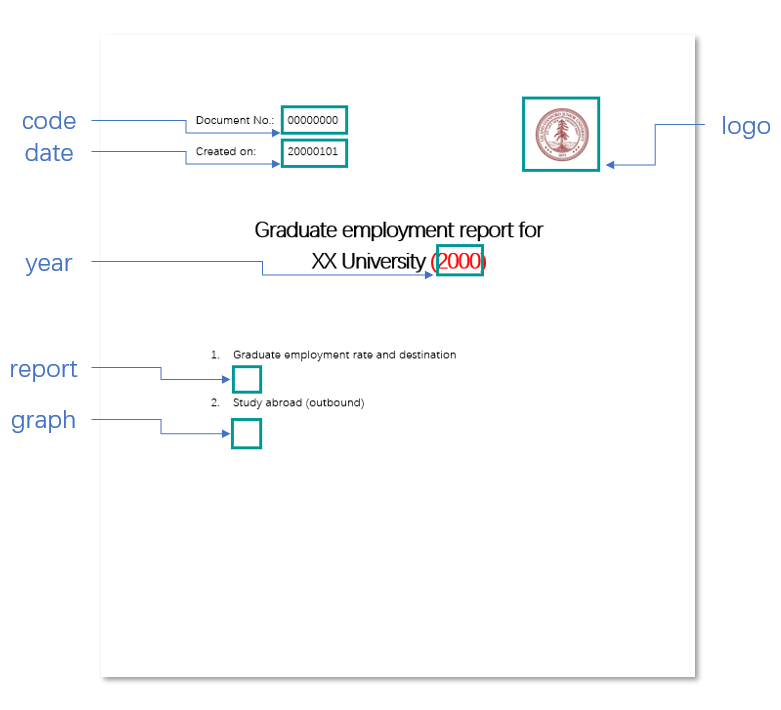
Take the “Graduate employment report” as an example. We can first make the report as a Word template (as the above figure shows). In the template, positions marked by green squares will receive updates. Bookmarks (named code, date, logo, year, report and graph for example) will be first inserted there to mark the positions where new text will be inserted or where the text will be replaced. The bookmarks can be defined on template text, such as code, date and year in the above template, so that during execution the new text will replace the template content while preserving the original text formatting. We can also just define a position where the new text will be inserted, such as bookmarks report and graph.
2. Create the report
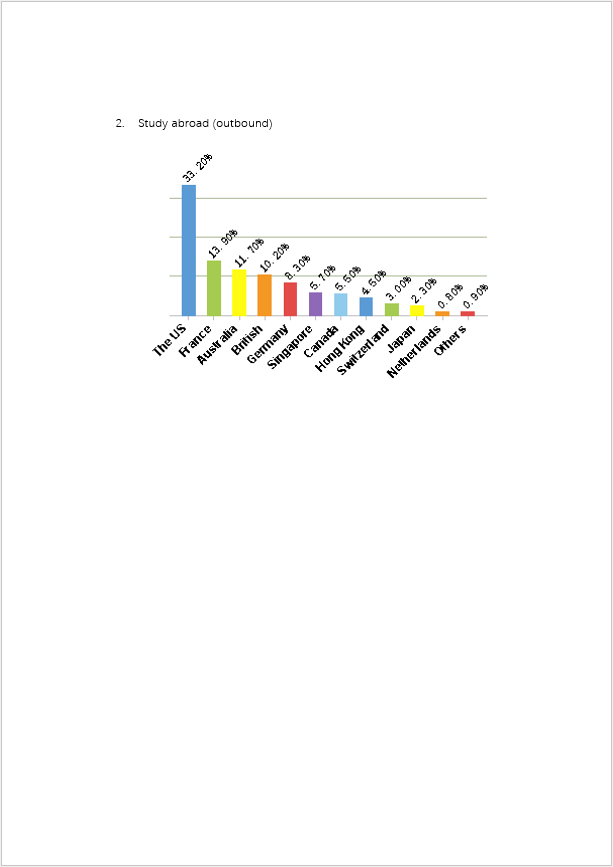
Create “employment destination report” and “Study abroad (outbound)” chart in the ReportLite designer.
3. Decompress the zipped ReportLite external library file to the working directory.
Note that the whole external library directory will be decompressed to the working directory, like E:\external\ReportLiteCli.
4. Set up external library within esProc environment.
Open the “Options” window and select the “External library directory”:
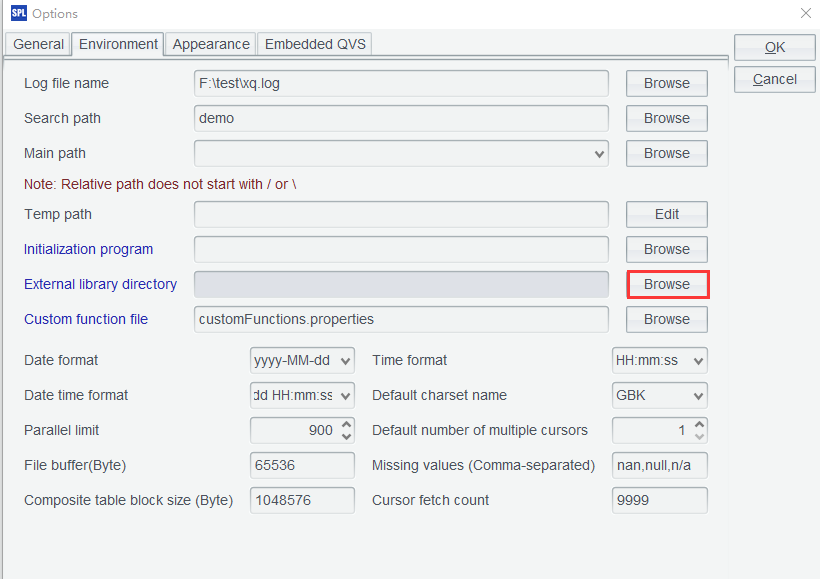
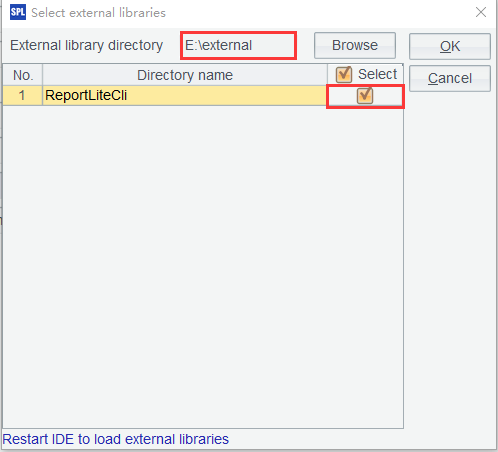
Set up the external library directory as follows. Select the directory one layer up the directory where the zipped file is located. The application automatically lists all external libraries in the external library directory, such as E:\external in the following figure. We then check the ReportLiteCli library to load it:
We need to restart esProc to load the external library.
5. Develop and place all files in one directory.
If the “Main path” in “Options” window of the above Section 4 is empty, put all related files in the same directory. In the SPL script, we just need to reference the file names. This makes it convenient to migrate and maintain a certain part of the script code. If there are a lot of files under one project and some of them need to be shared, it is more convenient to manage the files using categorized package names structured relative to the main directory.
For example, when all files are located in E:\external\demo:

6. Edit and execute script demo.splx to generate the expected Word document.
| A | B | |
|---|---|---|
| 1 | =reportlite_open(“template.docx”) | Open the Word template |
| 2 | =reportlite_insert(A1,“code”,“12345678”) | Replace text at positions marked by bookmarks “code”, “date” and “year |
| 3 | =reportlite_insert(A1,“date”,“20240730”) | |
| 4 | =reportlite_insert(A1,“year”,“2024”) | |
| 5 | =file(“logo.jpg”) Load the logo file | |
| 6 | =reportlite_insert(A1,“logo”,A5) | Replace the image marked by bookmark “logo” |
| 7 | =reportlite_open(“report.rptx”) | Open ReportLite file report.rptx |
| 8 | =reportlite_run(A7) | Compute the specified report |
| 9 | =reportlite_insert(A1,“report”,A7) | Insert the finished report at the position marked by bookmark “report” |
| 10 | =reportlite_open(“graph.rptx”) | Open ReportLite file graph.rptx |
| 11 | =reportlite_run(A10) | Compute to plot the chart |
| 12 | =reportlite_insert(A1,“graph”,A10) | Insert the finished chart at the position marked by bookmark “graph” |
| 13 | =reportlite_write(A1,“2024.docx”) | Write the document to which the report is inserted to 2024.docx |
SPL Official Website 👉 https://www.esproc.com
SPL Feedback and Help 👉 https://www.reddit.com/r/esProcSPL
SPL Learning Material 👉 https://c.esproc.com
SPL Source Code and Package 👉 https://github.com/SPLWare/esProc
Discord 👉 https://discord.gg/sxd59A8F2W
Youtube 👉 https://www.youtube.com/@esProc_SPL


Chinese version